
Beginners Guide to Crochet
Are you ready to start creating blankets, hats, gloves, whimsical toys, and even jewelry? Crocheting is fun and satisfying, and once you get the hang of it, the possibilities are endless!
This article starts at the absolute beginning. From learning about the tools needed to reading patterns. Let’s get started!

- Crochet hooks
- Yarn
- Basic stitches
- Patterns
- The Best Crochet video tutorials
Crochet Hooks
Hooks, hooks, and more hooks! There are so many hooks to choose from it can be overwhelming. Hooks can be “inline” style or “tapered.” They can be made of plastic, metal, wood, acrylic…. Each style and material has different qualities and interacts with the yarn differently.
Hooks are marked in US terms using letters and/or UK terms in mm. All you really need to know about hooks, is that size matters. The head size of a hook is designed for a specific weight of yarn. If it’s a heavy weighted yarn, you’ll use a larger size hook. Smaller weighted yarn uses a smaller sized hook. When you’re following a pattern it will almost always tell you what weight yarn and what size hook to use.
My advice for absolute beginners is to start simple. Purchase a basic aluminum hook set that includes a H-8 US or 5mm UK hook to learn. Sets usually come with a variety of sizes and some little extras like stitch markers and yarn needles. Aluminum hooks are inexpensive and great for learning the basics. When you’re ready to commit to mastering crocheting, spend a little more if you like and try the ergonomic handles, and fun designer hooks. It’s your preference, do what works best for you.

Yarn
After you learn to crochet you’ll never walk into a craft store again without spending way too much time wandering the yarn isles. Seeing so much yarn in one place will make you drool!
Most yarn will give you information about the weight, material, how many yards and, how to care for the material when washed. It will also tell you what size hook is recommended.
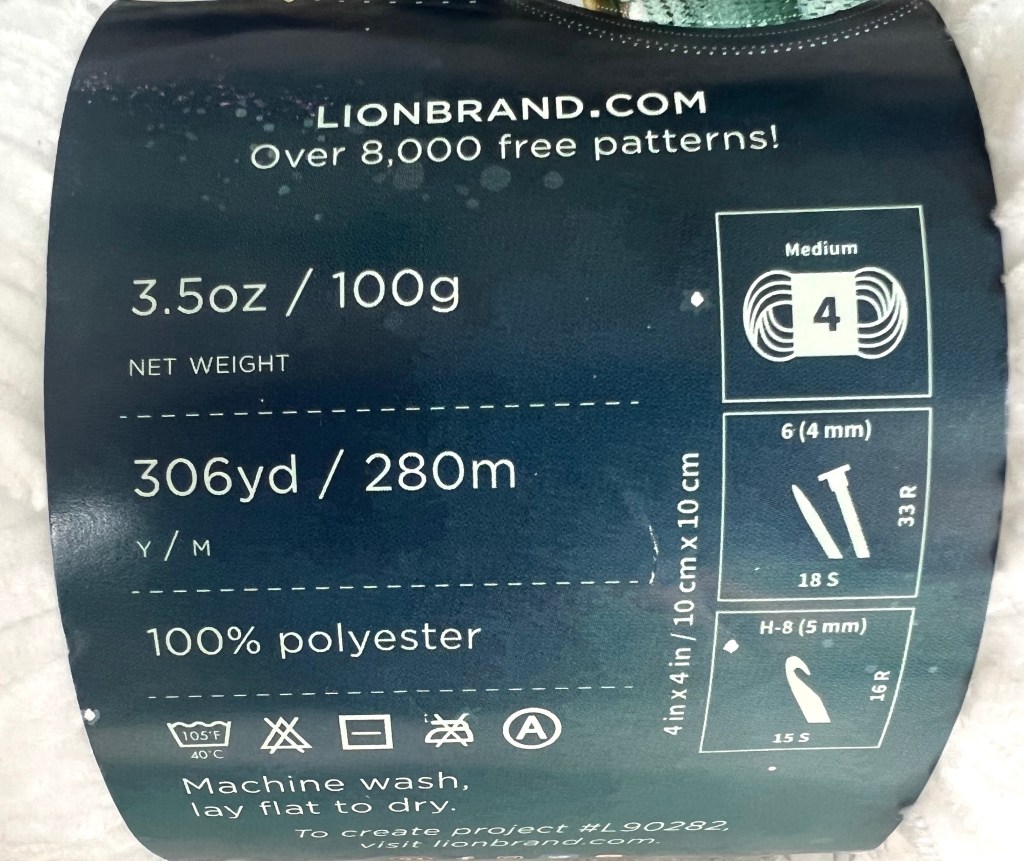
Although the actual weight is listed, the weight of yarn isn’t referring to the actual weight in pounds and ounces, but to the thickness of the strand of yarn. The picture above is a medium weight number 4. In general, yarn is divided into seven different yarn weight categories labeled with the numbers 0 through 7. These categories are (from 0-7): lace, super fine, fine, light, medium, bulky, super bulky, and jumbo.
Be mindful of the weight of yarn you choose for a project. 3 or 4 stitches of medium yarn might equal 20 stitches of fine yarn. You don’t want to spend hours on a clothing project and not have it fit! So make sure you read the pattern carefully when choosing.
Shop Lion Brand Yarn Here (Aff)
Basic stitches and common abbreviations
If you can commit these six terms and stitches to memory, you can create a vast amount of beginner projects.
Slip knot – a knot used to attach yarn to a crochet hook.
Yarn Over – YO or Yrno: a term used in patterns instructing you to wrap yarn over your hook. (This creates another loop on your hook.)
Chain Stich – Ch: This stitch is used to create a chain like stitch, usually used as a foundation of a pattern. With a slip knot on your hook, yarn over and pull through the loop on your hook. Repeat Ch stitch as many times as your pattern instructs.
Single Crochet – Sc: Single crochet is the shortest and most basic of stitches used. After a series of Chains or stitches; insert hook into the second Ch/stitch from hook, Yrno, pull up a loop, Yrno, pull through both loops on your hook.
Double Crochet – Dc: Double crochet is an addition to single crochet and works up a project faster. After a series of Chains or stitches; Yrno, insert hook into the second Ch/stitch from hook, Yrno, pull up a loop, Yrno, pull through two loops, Yrno, pull through two loops.
Slip Stitch – SlSt: Stitch mostly used for joining and creating seems. Inset hook into stitch, Yrno, pull up a loop, pull through loop on hook. *Do not Yrno after pulling up first loop.
Reading Patterns
When choosing a pattern, be sure to find the level of experience needed to ensure you can complete it successfully. Beginner, intermediate or advanced should be labeled near the top of the pattern information. If you’re a beginner, start with a beginner pattern. This will build confidence and avoid any frustrating set-backs.
It’s also helpful to chose a pattern with a step-by -step video tutorial included. This makes it easier if you get stuck and aren’t sure how to continue.
Once you’ve chosen your pattern, review the instructions to make sure you fully understand what the project demands. Most crochet patterns have the following sections:
- An “about” section that has pattern notes
- Yarn, materials and notions needed
- Information on gauge, tension and/or sizing
- Abbreviations used
- Any special stitches used
These all provide useful details you need to know before you begin.
Patterns are read in rows, Example Pattern:
Style- Simple Dishcloth
Materials:
- H hook, 5 mm
- 100% cotton yarn, 4 medium weight
- Scissors
- Yarn Needle
Abbreviations:
ch- chain
hk- hook
sc- single crochet
dc- double crochet
sk- skip
sl st- slip stitch
Pattern Instructions:
Begin with a foundation- Ch 27
Row 1: Dc in 4th ch from the hk, dc in next, ch 1, *sk next st, dc in next, ch 1, sk next st, dc in next 5 sts, ch 1,* repeat from *once more, sk next st, dc in next, ch 1, sk next st, dc in last 3 sts, ch 2, turn (24).
Row 2-11: Sk first st, dc in next 2 sts, ch 1, *sk next st, dc in next, ch 1, dc in next 5 sts, ch 1,* once more, sk next st, dc in next, ch 1, sk next st, dc in last 3 sts, ch 2, turn (24).
Edging: Sc around dishcloth putting 2 sc in each corner.
Sl st in first stitch and fasten off. Weave in end.
You’re done!
Most of all, don’t stop trying! The more patterns you try, and the more tutorials you watch, the more you’ll learn.
Try this fingerless glove pattern for beginners with picture tutorials.
